Flashing the CC2531 USB stick
The firmware can be flashed with multiple devices. The easiest but most expensive option is with the CC Debugger from Texas Instruments or a chinese clone SmartRF04EB, which is described on this page. However, you can also use a Raspberry Pi or a MCU like the Arduino Uno or the cheap ESP8266/ESP32 with four dupont cables and optionally a downloader cable. More information about alternative flashing methods can be found here: Alternative firmware flashing methods. When using Arduino/ESP8266/ESP32, you can use the simple browser-based method with XZG Multi-Tool, as described in the Web based solution section below.
NOTE 1: In case you are already running a Zigbee network: reflashing does not require repairing of all devices, see What does and does not require repairing of all devices?
NOTE 2: In this tutorial we will flash the default firmware. For larger network (20+) or when experiencing stability problems the source routing firmware is recommended. This firmware has a limitation of 5 direct children so make sure to have enough routers in your network.
NOTE 3: The CC2531 USB dongle can be flashed also with the CC2530 firmware to be operated via the P0.2/P0.3 serial pins (which are the first one and the second one of the IO expansion port). Be careful when using the CC2531 in association with an ESP8266 (as if it were the CC2530): the onboard USB power supply may not be able to power an additional ESP8266 without overheating/failing.
Required hardware
The following additional hardware is required in order to flash the CC2531:
| Name | Price | Picture |
|---|---|---|
| CC Debugger | +-9$ on AliExpress |  |
| CC2531 downloader cable | +-2$ on AliExpress |  |
or you can use almost any Arduino, ESP8266 or ESP32 board as alternative for CC Debugger, when using XZG Multi-tool.
Web based solution
Using a CC Debugger (works on any desktop OS and Android)
- No software installation required on your host device (Windows users need WinUSB driver)
- Requirements: WebUSB-compatible browser (Chrome, Edge, or Chromium-based)
- Connect
CC Debugger --> CC2531 downloader cable --> CC2531 USB stick - Connect BOTH the
CC2531 USB stickand theCC Debuggerto your device via USB - If the CC Debugger LED is RED, press the Reset button. The LED should turn GREEN
- Download the firmware CC2531_DEFAULT_20211115.zip
- Open XZG Multi-tool, click
Connect Debuggerand flash the firmware (.hexor.binfile)
Using Arduino/ESP8266/ESP32 (works on any desktop OS)
- No software installation required on your PC
- Requirements: Web Serial API-compatible browser (Chrome, Edge, or Chromium-based)
- Flash your Arduino/ESP8266/ESP32 board with CCLoader firmware (can be done using XZG Multi-tool) For pinout information on how to connect the board to the CC2530, click the info button after selecting the firmware in the cloud FWs list. A popup will display the required connections.
- Connect
CCLoader (Arduino/ESP) --> CC2531 downloader cable --> CC2531 USB stick - Connect BOTH the
CC2531 USB stickand theCCLoader boardto your PC via USB - Download the firmware CC2531_DEFAULT_20211115.zip
- Open XZG Multi-tool, click
Connect Loaderand flash the firmware (.hexor.binfile)
Windows
Install SmartRF Flash programmer (NOT V2). This software is free but requires a Texas Instruments account in order to download.
Install the CC debugger driver on your PC (Windows only). Before continuing, verify that the CC Debugger driver has been installed correctly. See Figure 1. Verify Correct Driver Installation @ Chapter 5.1. In case the CC Debugger is not recognized correctly install the driver manually.
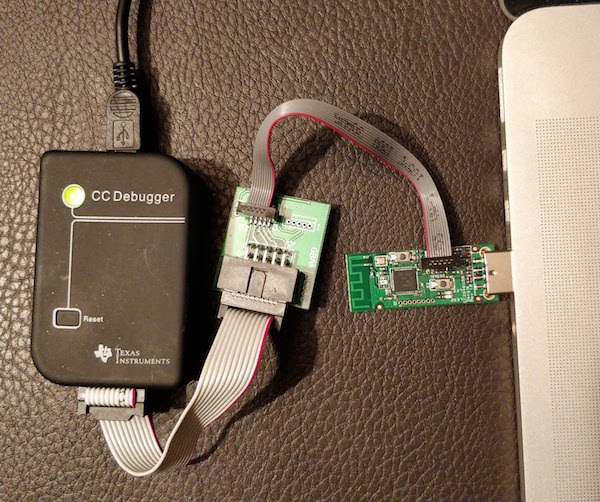
Connect
CC debugger --> Downloader cable CC2531 --> CC2531 USB sniffer.Connect BOTH the
CC2531 USB snifferand theCC debuggerto your PC using USB.If the light on the CC debugger is RED press set reset button on the CC debugger. The light on the CC debugger should now turn GREEN. If not use CC debugger user guide to troubleshoot your problem.
Download the firmware CC2531_DEFAULT_20211115.zip
Start SmartRF Flash Programmer, setup as shown below and press
Perform actions. Make sure to select the.hexfile, not the.binfile!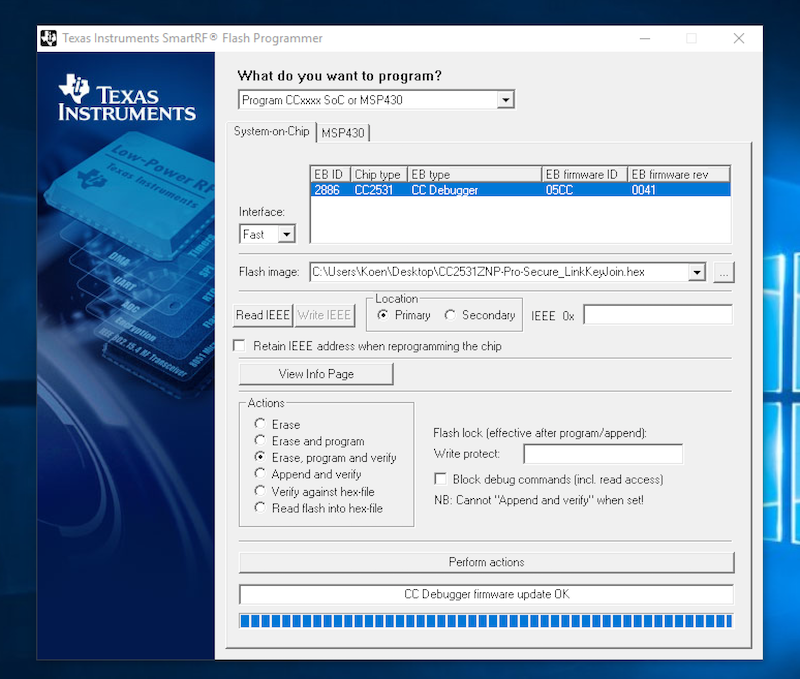
Linux or MacOS
Credits to @Frans-Willem for majority of instructions.
- Ubuntu (version >= 20.04): install cc-tool with
sudo apt install cc-tool& go on with 3. - Ubuntu/Debian: libusb-1.0-0-dev, libboost-all-dev, autoconf, libtool
- Fedora: dh-autoreconf, boost-devel, libusb1-devel, gcc-c++
- Archlinux: dh-autoreconf, libusb, boost
- macOS:
brew install autoconf automake libusb boost pkgconfig libtool - Raspbian: dh-autoreconf, libusb-1.0-0-dev, libboost-all-dev
- Build cc-tool
- Linux:
git clone https://github.com/dashesy/cc-tool.git
cd cc-tool

CPPFLAGS="-I/usr/local/include" \
LDFLAGS="-I/usr/local/include" \
 ./bootstrap

CPPFLAGS="-I/usr/local/opt/boost@1.76/include" \
CXXFLAGS="-std=c++0x" \
LDFLAGS="-L/usr/local/opt/boost@1.76/lib" \
LIBUSB_CFLAGS="-I/usr/local/include/libusb-1.0" \
 ./configure

make
- macOS:
git clone https://github.com/dashesy/cc-tool.git
cd cc-tool

CPPFLAGS="-I/opt/homebrew/include" \
LDFLAGS="-I/opt/homebrew/include" \
 ./bootstrap

CPPFLAGS="-I/opt/homebrew/include" \
CXXFLAGS="-std=c++0x" \
LDFLAGS="-L/opt/homebrew/lib" \
LIBUSB_CFLAGS="-I/opt/homebrew/include" \
 ./configure

make
Connect
CC debugger --> Downloader cable CC2531 --> CC2531 USB sniffer.Connect BOTH the
CC2531 USB snifferand theCC debuggerto your PC using USB.If the light on the CC debugger is RED, press the Reset button on the CC debugger. The light on the CC debugger should now turn GREEN. If not, try to reboot and retry or follow the CC debugger user guide to troubleshoot your problem.
Download the firmware CC2531_DEFAULT_20211115.zip.
Flash your firmware:
sudo ./cc-tool -e -w CC2531ZNP-Prod.hex
How-to check the installed firmware version
Zigbee2MQTT will output the installed firmware version to the Zigbee2MQTT log on startup:
Zigbee2MQTT:info 2019-11-09T13:01:14: Coordinator firmware version: '{"type":"zStack30x","meta":{"transportrev":2,"product":2,"majorrel":2,"minorrel":7,"maintrel":2,"revision":20190425}}'
In the above example the version is 20190425.