Windows
These instructions explain how to run Zigbee2MQTT on Windows.
TIP
Before starting make sure you have an MQTT broker installed on your system. There are many tutorials available on how to do this, example. Mosquitto is the recommended MQTT broker but others should also work fine.
Install a USB-to-UART Bridge Virtual COM Port driver
In order to be able to communicate with your USB device over a virtual COM port, you might need a driver for your OS in order for it to be able to be found by your flashing software.
- For CP210x based chipsets, there is a driver available at Silicon Labs' website.
- For CC1352/CC2652/CC2538 based chipsets, have a look at FTDI chip's website for drivers.
Installing
- Download and install Node.js 22 LTS from their website
- Open up a
Command promptorPowershellfrom the Start menu (Powershell has prettier colors) - Verify Node.js was successfully installed
node --version - Enable corepack
corepack enable - Choose a suitable directory for Zigbee2MQTT and copy all the files from the Zigbee2MQTT repository
- if you prefer to use git (which you should), just clone the whole repository
git clone --depth 1 https://github.com/Koenkk/zigbee2mqtt/ - otherwise use the green
Clone or downloadbutton to download the zip archive, then extract it
- if you prefer to use git (which you should), just clone the whole repository
- Change to the newly created directory and install dependencies with pnpm:
pnpm install --frozen-lockfile
Starting Zigbee2MQTT
Now that we have setup everything correctly we can start Zigbee2MQTT. Change to the root directory of your installation and run the Zigbee2MQTT:
pnpm start
On first start, Zigbee2MQTT will start the onboarding on port 8080. Navigate to this board and configure accordingly. More information about onboarding.
Once the onboarding is completed, you will see something like:
Zigbee2MQTT:info 2019-10-18 10:56:22 PM Logging to directory: 'D:\Documents\GitHub\zigbee2mqtt\data\log\2019-10-18.22-56-22'
Zigbee2MQTT:info 2019-10-18 10:56:22 PM Starting Zigbee2MQTT version 1.6.0 (commit #e26ad2a)
Zigbee2MQTT:info 2019-10-18 10:56:22 PM Starting zigbee-shepherd
Zigbee2MQTT:info 2019-10-18 10:56:24 PM zigbee-shepherd started
Zigbee2MQTT:info 2019-10-18 10:56:24 PM Coordinator firmware version: '20190608'
Zigbee2MQTT can be stopped anytime by pressing CTRL + C and then confirming with Y.
ATTENTION
In case Zigbee2MQTT fails to start with USB adapter discovery error (No valid USB adapter found). Specify valid 'adapter' and 'port' in your configuration., we need to configure the serial section in the configuration.yaml.
First determine which COM port is assigned to your device:
- Open up Start menu and start typing
Device Manager - Expand
Ports (COM & LPT) - Look for a node similar to
USB Serial Device (COM4)
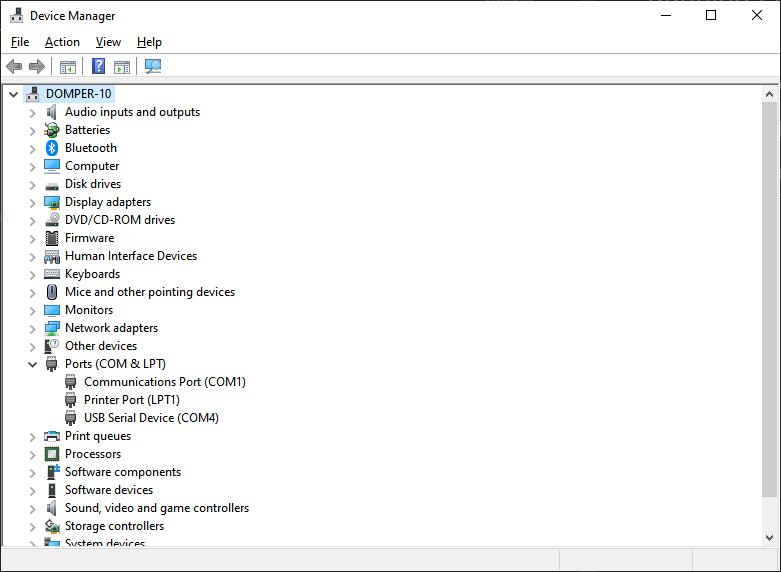
For the example above, we would use port: COM4 in the configuration.yaml. Next configure the serial section as described here.
Updating Zigbee2MQTT
It is recommended to back up the Zigbee2MQTT \data subdirectory before performing any modifications.
- First, stop Zigbee2MQTT
- Navigate to the directory where the Zigbee2MQTT repository was cloned to in the Installing step
- Pull the latest content from the configured source
git pull - Update dependencies
pnpm install --frozen-lockfile - Restart Zigbee2MQTT
pnpm start
Below is a sample PowerShell script to run which will take care of:
- Backing up the data directory
- Updating Zigbee2MQTT
- Restoring the data directory contents
The script will automatically check if node is running (in case Zigbee2MQTT is still running) and ask to close if it is. You will need to manually stop and restart it afterwards.
Ensure you update the relevant paths in the script to match your environment. By default, the script will target D:\ProgramData\zigbee2mqtt\ as the install folder and C:\Temp\ as the folder where to temporarily store the data folder backup
Run script from an elevated administrative PowerShell console
# Z2M must not be running
# This script will NOT re-start it

# Modify below paths as necessary
$z2mPath = "D:\ProgramData\zigbee2mqtt"
$backupPath = "C:\Temp"


# DO NOT MODIFY below this line
# ------------------------------------------------------------------------------
# Build paths
$z2mDataPath = Join-Path -Path $z2mPath -ChildPath 'data'
$z2mBackupPath = Join-Path -Path $backupPath -ChildPath 'z2mdata'

# Check if Z2M is running
if (Get-Process -Name "node" -ErrorAction SilentlyContinue) {
    # Found running instance of node, stop script
    "Node still running, please close first" | Write-Host -ForegroundColor Red
    pause
    return
}
else {
    # Continue!
    "Node not running, Zigbee2MQTT upgrade will continue" | Write-Host -ForegroundColor Green
}
# Change working directory to:
"Setting location to ""$($z2mPath)""" | Write-Host
Set-Location -Path $z2mPath
# Back up data directory:
"Backing up data subdirectory" | Write-Host
Copy-Item -Path $z2mDataPath -Destination $z2mBackupPath -Recurse
# Pull the latest release:
"Running ""git pull""" | Write-Host
& git pull
# Update dependencies:
"Running ""pnpm install --frozen-lockfile""" | Write-Host
& pnpm install --frozen-lockfile
# Restore backed-up data:
"Restore backed up data directory" | Write-Host
Copy-Item -Path "$($z2mBackupPath)\*" -Destination $z2mDataPath -Recurse -Force
# Delete back up folder:
"Delete backed up folder" | Write-Host
Remove-Item -Path $z2mBackupPath -Recurse
"Update completed!" | Write-Host -ForegroundColor Green
pause