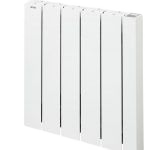
Acova ALCANTARA2
| Model | ALCANTARA2 |
| Vendor | Acova |
| Description | Alcantara 2 heater |
| Exposes | climate (occupied_heating_setpoint, unoccupied_heating_setpoint, local_temperature, system_mode, running_state) |
| Picture |  |
Notes
Pairing
- Press and hold the
Modebutton to enter configuration mode - If already paired with the Enki box, press and hold the
-(minus) button untilOffis displayed (you'll probably also have to first remove the heater from the Enki box using the dedicated app) - Press and hold the
+(plus) button until a code appears on the screen (this is a pairing code used with the Enki box app we don't use here) - Turn on pairing mode in zigbee2mqtt
- Press (and sometimes hold) the
+button until a "progress bar" appears on the screen - Wait for pairing. The device should show up in zigbee2mqtt in a few seconds and the screen should now display
On - Press and hold the
Modebutton to leave configuration mode (or wait for ~ 30 sec to 1 minute). The device should now display "Box" on the top right corner of the screen and the temperature setpoint
Options
How to use device type specific configuration
thermostat_unit: Controls the temperature unit of the thermostat (default celsius). The value must be one ofcelsius,fahrenheit
Exposes
Climate
This climate device supports the following features: occupied_heating_setpoint, unoccupied_heating_setpoint, local_temperature, system_mode, running_state.
occupied_heating_setpoint: Temperature setpoint. To control publish a message to topiczigbee2mqtt/FRIENDLY_NAME/setwith payload{"occupied_heating_setpoint": VALUE}whereVALUEis the °C between7and28. To read send a message tozigbee2mqtt/FRIENDLY_NAME/getwith payload{"occupied_heating_setpoint": ""}.local_temperature: Current temperature measured on the device (in °C). To read send a message tozigbee2mqtt/FRIENDLY_NAME/getwith payload{"local_temperature": ""}.system_mode: Mode of this device. To control publish a message to topiczigbee2mqtt/FRIENDLY_NAME/setwith payload{"system_mode": VALUE}whereVALUEis one of:off,heat,auto. To read send a message tozigbee2mqtt/FRIENDLY_NAME/getwith payload{"system_mode": ""}.running_state: The current running state. Possible values are:idle,heat. To read send a message tozigbee2mqtt/FRIENDLY_NAME/getwith payload{"running_state": ""}.
